
SwimSafer Stage 2 is a critical milestone in Singapore’s national swimming education framework. Designed for young swimmers who have completed Stage 1, this level focuses on building water confidence, controlled swimming skills, and basic survival awareness in deeper water.
For many parents, Stage 2 is where children begin to transition from simple water play to structured swimming competency, preparing them for higher SwimSafer levels and eventually the MOE Primary School programme.
This comprehensive guide explains exactly what SwimSafer Stage 2 involves, how children are assessed, how long it takes, and how to best prepare for success.
What Is SwimSafer Stage 2?
SwimSafer Stage 2 is part of Singapore’s National Water Safety Council (NWSC) SwimSafer Programme, endorsed by Sport Singapore and Singapore Aquatics.
At this stage, swimmers are expected to demonstrate:
- Increased confidence in deeper water
- Ability to swim longer distances independently
- Improved breath control and body coordination
- Understanding of basic water safety concepts
Unlike Stage 1, which focuses heavily on water confidence, Stage 2 introduces structured swimming skills with control and endurance.
Objectives of SwimSafer Stage 2
The main objectives of SwimSafer Stage 2 are to:
- Strengthen foundational swimming techniques
- Develop safe entries into deeper water
- Improve floating, gliding, and propulsion skills
- Build stamina through continuous swimming
- Introduce basic survival awareness and safety knowledge
By the end of Stage 2, children should feel comfortable moving independently in water beyond standing depth under supervision
Type of Entries Comparison for Stage 2 to Stage 4 (Bronze)
| Stage 2 | Stage 3 | Stage 4 (Bronze) |
| Step in Entry | Straddle Jump | Compact Jump |
SwimSafer Stage 2 Lesson Plan Singapore (2025): Session-by-Session Breakdown
1. What Is SwimSafer Stage 2?
SwimSafer Stage 2 is part of Singapore’s national water safety programme, developed by the National Water Safety Council (NWSC) and endorsed by Sport Singapore and Singapore Aquatics. It is aligned to the MOE Primary School swimming curriculum and is structured under the SwimSafer 2.0 framework.
At Stage 2, swimmers transition from shallow-water confidence (Stage 1) to performing structured skills in deeper water, up to 1.8m. The stage is designed to produce a swimmer who can move safely and independently in a full-size pool and respond calmly in an unexpected water entry situation.
Who is Stage 2 for?
- Children who have completed SwimSafer Stage 1 or passed an equivalent skill assessment
- Swimmers aged 6 to 12 years (though age is not a strict barrier — ability is)
- Adults who are comfortable in shallow water and ready to develop deeper-water competence
2. All Assessed Skills at a Glance
SwimSafer Stage 2 has four assessed components. The table below maps each skill to its category and assessment type:
| # | Skill | Distance / Duration | Component | Type |
|---|---|---|---|---|
| 1 | Step-in entry (unassisted) | — | Swimming Skills / Seq. 2A | Assessed |
| 2 | Front swim (any stroke) | 25m | Swimming Skills | Assessed |
| 3 | Back swim | 15m | Swimming Skills | Assessed |
| 4 | Front float (no goggles) | 10 seconds | Survival Sequence 2A | Assessed |
| 5 | Swim front 5m then roll to back | 5m + rollover | Survival Sequence 2A | Assessed |
| 6 | Back float (no goggles) | 10 seconds | Survival Sequence 2A | Assessed |
| 7 | Swim back 5m | 5m | Survival Sequence 2A | Assessed |
| 8 | Scull / float / tread water | 30 seconds | Survival Sequence 2A | Assessed |
| 9 | Object recovery (chest-deep water) | 1 object | Survival Sequence 2A | Assessed |
| 10 | Resurface and pool exit | — | Survival Sequence 2A | Assessed |
| 11 | Clothed survival stroke swim | 15m | Survival Sequence 2B | Assessed |
| 12 | Fit PFD, jump entry (min. 1.4m deep) | — | Survival Sequence 2B | Assessed |
| 13 | Swim 25m with PFD, exit & remove PFD | 25m | Survival Sequence 2B | Assessed |
| 14 | SwimSafer online theory quiz | Online | Theory | Theory |
3. Full 16-Lesson SwimSafer Stage 2 Lesson Plan
This plan is designed for 30-minute group lessons held once per week. Instructors running 45-minute or twice-weekly lessons can merge lessons as appropriate. Each lesson builds sequentially; do not skip ahead until the prior skill is stable.
Water Entry, Orientation & Confidence Review
Foundation check — establish pool comfort and Stage 1 carry-overs
- ▶Warm-up: Supervised free movement, bob 10 times, blow bubbles to pool floor
- ▶Entry practice: Step-in entry from pool deck — focus on bent knees, eyes looking at entry point, controlled foot placement, legs relaxed on impact
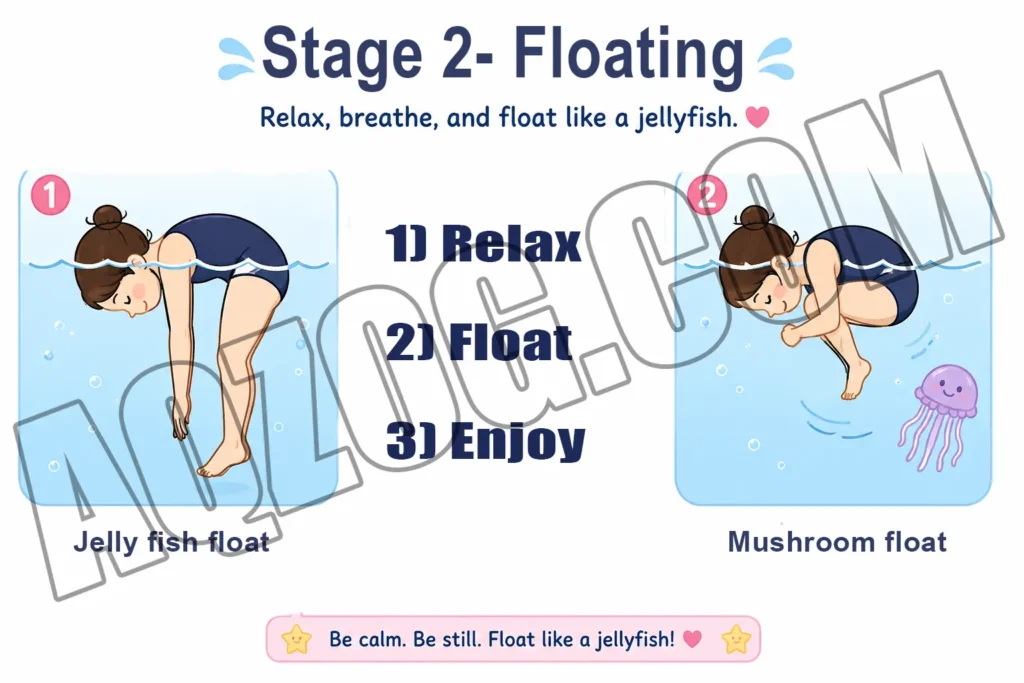
- ▶Front float review: Mushroom float and jellyfish float — hold 10 seconds, arms relaxed, face submerged
- ▶Back float review: Ears submerged, hips up, arms slightly out for balance, 10 seconds
- ▶Pool exit practice: Safe exit using pool ladder and pool wall — two-hand grip, strong push-up
Front Kick Development & Breath Control
Build front propulsion and consistent bilateral breathing
- ▶Kick on wall: 2 × 30 seconds flutter kick holding gutter, face in water, exhale through nose and mouth
- ▶Kickboard laps: 3 × 15m kick on front with kickboard — breathing every 4 kicks, chin at water surface
- ▶Arm drill: Catch-up drill across width — one arm extended, full pull-through on alternating arm
- ▶Target distance: Full 25m front swim attempt using any stroke — record time and stroke quality observations
Back Swimming — Kick & Arm Coordination
Develop 15m back swim with stable body position
- ▶Back kick drill: Hold pool gutter, back kick 30 seconds — toes pointed up, knees below surface, kick from hips
- ▶Back glide with kick: Push off wall in back glide, add flutter kick, travel 10m
- ▶Back arm drill: One arm at a time — high recovery over the shoulder, pinky-first entry
- ▶Combined practice: 3 × 15m back swim — focus on flat hips, ears submerged, eyes to ceiling
Sculling Introduction & Body Rotation
Core survival skill: tread water, scull, and rollover technique
- ▶Sculling drill (shallow): Standing in waist-deep water — arms out to sides, palms angled down, scull figure-of-eight motion
- ▶Sculling in deep water: Transition to deep end with noodle support, practice hands-only scull keeping chin above water
- ▶Treading water: Eggbeater or flutter kick with sculling arms — target 30 seconds sustained
- ▶Rollover drill: Swim 5m on front, on command roll from front to back — initiate roll with head, then shoulders, then hips
No-Goggle Practice Begins & Front Float Refinement
All skills now practised without goggles
From Lesson 5 onwards, all water skills are practised without goggles to match the assessment condition. Allow extra time for children to adjust to open-eyed underwater vision.
- ▶Eyes-open drill: Blow bubbles and open eyes to see fingers held underwater — build comfort with pool water in eyes
- ▶Front float (no goggles): Mushroom or jellyfish float, face down, 10 seconds — relaxed body, no moving limbs
- ▶Back float (no goggles): 10 seconds, ears in water, stable hips-up position
- ▶Front swim (no goggles): 3 × 10m — practise sighting every 4 strokes to keep direction without goggles
Survival Sequence 2A — Full Run-Through (First Attempt)
Introduce the full sequence order for the first time
Walk swimmers through Survival Sequence 2A step by step before attempting it continuously. Post the sequence on a whiteboard or printed card for swimmers to reference.
- 1Step-in entry from pool deck (controlled, look at entry point)
- 2Front float — 10 seconds, face down, no goggle
- 3Swim 5m on front, then roll onto back
- 4Back float — 10 seconds
- 5Swim 5m on back
- 6Scull, float, or tread water — 30 seconds
- 7Recover object from chest-deep water floor
- 8Resurface, swim to wall, exit safely
Object Recovery & Deep-Water Confidence
Feet-first surface dive and object recovery drill
- ▶Shallow dive practice: In chest-deep water, bend knees and push down to touch pool floor with hands — retrieve a sinker toy
- ▶Feet-first dive: Tread water, then push down feet-first to reach pool floor, grasp object, kick back up
- ▶Object recovery drill: 5 repetitions — place weighted ring on floor, swimmer treads water above it, dives to retrieve, resurfaces, swims to wall
- ▶Combo drill: Mini Sequence 2A from 30-second tread → dive → exit (last 3 steps only)
25m Front Swim & 15m Back Swim — Assessment Build-Up
Distance stamina, stroke consistency, and no-goggle 25m target
- ▶Warm-up: 4 × 10m front kick on noodle — no goggles, bilateral breathing every 4 kicks
- ▶25m front swim attempt (no goggles): Full continuous swim, any stroke — observe breathing pattern and stroke count
- ▶Rest and feedback: 3-minute rest, verbal feedback on head position, breathing, and arm pull
- ▶15m back swim (no goggles): Continuous, ears in water, steady kick — 2 attempts
- ▶Cool down: Back float 30 seconds, then easy exit
Survival Sequence 2A — No Goggles, Continuous
Full sequence performed without goggles and without breaks
- ▶Sequence 2A (no goggles): Full continuous run-through — coach observes only, no assistance
- ▶Debrief: Review any steps where the child paused, was unsteady, or needed correction
- ▶Individual drilling: Repeat only the weak step(s) identified 3–5 times
- ▶Second full run: Complete Sequence 2A again from entry to exit
Clothed Swimming Introduction (Seq. 2B Part 1)
First experience swimming in shorts and t-shirt
Swimmers wear swimwear + shorts + t-shirt for this lesson. Alert parents in advance so children arrive prepared.
- ▶Awareness discussion: Explain how wet clothes increase drag and weight — calm, matter-of-fact tone
- ▶Entry clothed: Step-in entry while dressed — feel the difference in water resistance
- ▶Clothed float: Front float 10 seconds, back float 10 seconds — clothes make this harder; focus on staying calm
- ▶Clothed swim: 2 × 10m survival stroke (head-up breaststroke or elementary backstroke) — face must clear the water at all times
PFD Fitting & Jump Entry Practice
Personal Flotation Device skills for Sequence 2B
- ▶PFD on land: Each child fits their own PFD correctly — zipper closed, straps tightened so two fingers fit snugly. Do not proceed until fit is correct
- ▶PFD in water: Enter pool wearing PFD, float in recovery position for 60 seconds
- ▶Swim with PFD: 2 × 15m swim wearing PFD — any stroke, focus on working with buoyancy, not against it
- ▶Jump entry (min. 1.4m pool): Compact jump entry with arms crossed over PFD — resurface and float calmly
- ▶PFD removal: Climb out of pool, remove PFD at poolside — unzip, loosen straps, remove over head
Survival Sequence 2B — Full Run-Through (Clothed)
Complete clothed sequence: survival swim + PFD jump + 25m swim + exit
Swimmers wear swimwear + shorts + t-shirt for the full sequence.
- 1Swim 15m using survival stroke (face above water at all times), exit pool safely
- 2Fit PFD correctly on pool deck
- 3Jump into deep water (min. 1.4m), resurface calmly
- 4Swim 25m with PFD on
- 5Climb out of pool, remove PFD
Mock Assessment 1 — Swimming Skills & Sequence 2A
Simulated assessment conditions for Swimming Skills and Seq. 2A
Run this lesson exactly as the actual assessment. No coaching cues during the swim. Record results for each child.
- ▶25m front swim (no goggles, no stopping, no wall touch)
- ▶15m back swim (no goggles, no stopping)
- ▶Full Survival Sequence 2A without goggles, without breaks
After the mock test, provide individual written feedback to parents or guardians on which components are “ready” and which need more time.
Mock Assessment 2 — Sequence 2B & Theory Quiz Prep
Simulated clothed assessment + online theory walkthrough
- ▶Full Survival Sequence 2B in clothed conditions — assessor-style observation only
- ▶Theory quiz walkthrough: On dry land, go through 5–10 sample quiz questions as a group — pool rules, warning signs, responsible behaviour
- ▶Remind parents to complete the online theory quiz at home before the assessment date — failure to do so delays certification
Consolidation & Individual Weak Points
Targeted revision based on mock test results
Split swimmers into two groups: those ready for assessment (revise and keep sharp) and those needing more practice (focus on their specific weak skill).
- ▶Ready swimmers: 25m no-goggle swim + full Sequence 2A at assessment pace — aim for smooth, unhurried performance
- ▶Developing swimmers: Repeat the specific step(s) from Sequence 2A or 2B that were weak — 5–8 focused repetitions
Final Readiness Assessment & Certification
Official SwimSafer Stage 2 assessment session
This lesson is the official assessment. It should be conducted by a certified Sport Singapore / Singapore Aquatics assessor. All four components are assessed:
- ✓25m front swim + 15m back swim
- ✓Survival Sequence 2A (no goggles)
- ✓Survival Sequence 2B (clothed + PFD)
- ✓Online theory quiz (confirmed completed)
Children who pass all components receive the SwimSafer Stage 2 e-certificate. Those who do not pass may reattempt individual components after further practice.
4. Survival Sequences 2A and 2B Explained
🌊 Survival Sequence 2A — Without Goggles
This sequence simulates an unexpected fall into the water. The swimmer must stabilise, stay calm, and exit safely — all without goggles.
- Step-in entry — controlled step from pool deck. Look at the entry point. Knees slightly flexed. Legs relaxed as feet touch the pool floor.
- Front float (10 seconds) — stable face-down float. Mushroom or jellyfish position. Relaxed limbs. No movement. Assessor counts to 10.
- Swim 5m front, then roll to back — any front stroke for 5m, then initiate a roll. Roll starts from the head and shoulders, then hips follow.
- Back float (10 seconds) — stable, ears submerged, hips at surface. Arms slightly out for balance. Assessor counts to 10.
- Swim 5m on back — any back stroke.
- Scull, float, or tread water (30 seconds) — swimmer chooses their preferred method. Chin must stay above water throughout.
- Recover object — a weighted object on the floor of the chest-deep section. Swimmer dives down, retrieves it, resurfaces.
- Safe exit — swim to pool wall, use ladder or gutter, climb out cleanly.
👕 Survival Sequence 2B — Clothed (Shorts + T-shirt + Swimwear)
This sequence simulates accidental entry while dressed. The swimmer must remain calm, use survival skills, and operate a PFD. Calmness in deep water is specifically assessed.
- Clothed survival stroke swim — 15m — swimmer dressed in swimwear, shorts, and t-shirt. Face must clear the water at all times. Head-up breaststroke or any stroke that keeps the face above water. Swimmer exits pool safely after 15m.
- Fit PFD correctly — on pool deck, swimmer puts on a correctly sized personal flotation device. Zip closed, straps tightened to a snug two-finger fit.
- Jump entry into deep water (min. 1.4m) — compact upright jump, arms crossed on PFD, entry into pool of at least 1.4m depth. Resurface and float calmly.
- Swim 25m with PFD — any stroke, while wearing PFD. Work with the buoyancy, not against it.
- Climb out and remove PFD — exit pool from deep end, remove PFD at poolside.
5. Assessment Criteria for Each Component
Below are the key “must-see criteria” that assessors look for. These are based on the SwimSafer 2.0 assessor framework.
Step-In Entry
- Confident, controlled entry (not a jump)
- Eyes looking at the point of entry
- Knees slightly flexed on entry
- Legs relaxed when feet reach pool floor
Front Float (10 secs)
- Stable face-down position
- Face fully in water
- Limbs relaxed, not actively moving
- Held for full 10 seconds
Back Float (10 secs)
- Ears submerged
- Hips at or near surface
- Arms out for lateral stability
- Held for full 10 seconds
Front-to-Back Rollover
- Roll initiated from head and shoulders
- Hips follow in one smooth motion
- Complete within 2–3 body lengths
- Stable back float achieved after roll
Sculling / Treading (30 secs)
- Chin consistently above water
- Controlled, rhythmic motion
- No panic or erratic movement
- Sustained for full 30 seconds
Survival Stroke (15m clothed)
- Face above water at all times
- Calm demeanour maintained
- Continuous 15m without stopping
- Safe exit from pool
PFD Fitting
- Correctly sized PFD selected
- Zipper fully closed
- All straps tightened to snug fit
- PFD worn correctly (not upside down)
25m Front Swim
- Continuous — no stopping or wall holds
- Alternating or simultaneous arm/leg action
- Head position appropriate for stroke
- No goggle use during assessment
6. SwimSafer Stage 2 Online Theory Quiz
The theory quiz is a mandatory component of SwimSafer Stage 2. Certification cannot be awarded until the quiz is completed, regardless of how well the practical skills are performed.
What topics does the quiz cover?
- Pool safety rules — no running, no pushing, no diving in shallow water
- Warning and hazard signs — understanding signage at pools, beaches, and reservoirs
- Responsible water behaviour — swimming within ability, not swimming alone
- Importance of adult supervision — children swimming safely under watch
- Basic water safety knowledge — what to do if someone is in distress (shout, throw, don’t go)
How do I access the quiz?
The SwimSafer theory quiz is accessed online through the official SwimSafer portal. Parents and guardians can help younger children (under 8) complete the quiz at home. The quiz is self-paced with multiple-choice questions. Most children complete it in 10–15 minutes.
How should instructors incorporate theory into lessons?
Spend 3–5 minutes at the start or end of Lessons 13–15 reviewing theory topics verbally. Ask children questions like: “What do you do if you see a NO DIVING sign?” or “Why should you never swim alone?” This prepares them for the quiz and reinforces real-world safety habits.
7. Instructor Tips and Common Mistakes
Common reasons children fail or repeat Stage 2
- Goggles dependency — children who have always trained with goggles panic when asked to swim without them. Introduce goggle-free practice from Lesson 5, not the week before assessment.
- Poor breath control during back float — when nervous, children lift their head in back float, causing their hips to sink. Practise back float in isolation until it is automatic.
- Survival stroke technique — children attempt freestyle (face down) for the clothed 15m, then panic when they cannot breathe. Teach head-up breaststroke from Lesson 10 as the default survival stroke.
- PFD fitting errors — children often wear the PFD too loosely or put it on upside down. Practice fitting at least 5 times before the assessment.
- Theory quiz not completed — parents forget. Send a written reminder at Lessons 13, 14, and 15.
- Inconsistent attendance — Stage 2 skills decay if a child misses 3 or more consecutive lessons. Brief parents that regular attendance directly affects assessment readiness.
Tips for faster Stage 2 progression
- Enrol in twice-weekly lessons — progression is roughly twice as fast
- Practice floating in the bathtub or condo pool between lessons
- Watch the official SwimSafer sequence videos before assessment week
- Use the AQZOG mock assessment checklist (available from your coach) to track readiness at home
8. Frequently Asked Questions
Related SwimSafer Guides from AQZOG
Ready to Start SwimSafer Stage 2?
AQZOG certified coaches run small-group SwimSafer classes across Singapore’s ActiveSG pools. Our structured programme follows this exact lesson plan — giving your child the best chance of passing first time.
Enrol Now Learn More About Stage 2